Ah, you must mean the, uh, y’know. (Gestures to this lengthy and time-consuming transcript) Well, about that!
Let's begin at the beginning. One of the reasons we gamers love us our vidya games is because they illustrate a fully imagined, fully realized world for us to explore. Such wonderful universes have also come from books, TV, movies, comics, etc, but none of these media seems to capture the grandeur of a new world the way video games do. You’re limited in TV and movies to the one or two hours you spend with particular characters at a time; in books and comics, you’re limited to so many tens or hundreds - and sometimes thousands - of pages feasible to tell a story. But in a nearly limitless digital embrace, many video games can go on for hours, taking you to many different places, introducing you to many different people, giving you an unrivaled freedom to explore your way. Sure, they're not perfectly unbounded, but hey, you have to admit, they're pretty damn open, and getting more so as game development blossoms into a full blown art. Graphics, minigames, story, characters, design, gameplay, battle mechanics, strategy, so many things convalesce to create a great game, and when you hold the controller and interact with the story and environment through it, you are fully engaged in an alternate reality. None of the other media, fantastic as they are, can give you the same feeling of an otherworld, the like of which only dreams have ever been host to, right at your fingertips.
That's what I think, anyway. And, I believe one of the greatest insights into the world of a game is its script - especially in its entirety. Have you ever taken the time to read those journals or encyclopedias or other pieces of lore that some games give you? You know, it usually exists as an option in the main menu that tells you more about where you are and what you're doing, but you don't always look at it because you're busy kicking ass and farming materials and leveling up and getting through this mission and OH MY GOD what happened to Sazh?? I can't stop playing until I find out what happened to Sazh!! ...Well, as tedious as they may be, especially to people who just want in on the action, to loremongers like me, they're an invaluable source of inspiration, containing all sorts of little ficlets and Easter Eggs that you would otherwise miss. That goes for NPCs too - so many people fly through their games without ever bothering to talk to them, except to pick up a quest or whatnot.
Nah, for people like me, these are all fonts of food for thought, a delightful detail of these lovingly crafted environs and stories.
You can probably tell from my impassioned description that I likely would have started transcribing games anyway, even just for my own enjoyment, but I feel it would be a great injustice not to cite another huge inspiration to me in writing all of this: a great entity in the FFX fandom by the handle of Auronlu. She has authored a potpourri of FFX-related musings and resources, including, most famously, a truly epic alternate universe fanfiction and "labor of love", Love Her and Despair.
Another of her contributions is the FFX Script. I stumbled upon it while desperately looking for such an exhaustive reference to Spira - the world of FFX. I came across a lot of scripts, but all of them only included dialogue from cutscenes and FMVs, or other particular parts of the game, like battle dialogue. I wanted the whole thing. So, discovering Auronlu's script was a real treat. Not only did she record every piece of script, from every NPC and from every aspect of the game, but it's all presented in a very smart and intuitive format that makes full use of colors and fonts to recreate the natural flow of the story. Very much unlike others I've seen, which generally come in standard GameFAQs format - one giant, unattractive block of indistinguishable Courier text. You'll see this method of organization and dedication to completeness greatly influences my writings here!
So, I think that about sums it up. This is all an ambitious effort of mine to take note of every single part of each game I work on, and satisfy the most nerdiferous cravings of other Final Fantasy enthusiasts, aspiring game designers, and storytellers and creators like myself! And on that note, feel free to give me feedback if you find my works useful (or even if you don't)!
Showing posts with label walkthrough. Show all posts
Showing posts with label walkthrough. Show all posts
Thursday, December 12, 2013
Wednesday, December 11, 2013
Episode 1: New Bodhum 003 AF Part 2
Episode 1
New Bodhum, 003 A.F. Part 2
Treasure Checklist
| |
Medical Kit
|
Winding Way
|
Iron Bangle
|
Tidal Shallows
|
Phoenix Down
|
Tidal Shallows
|
Gysahl Greens x2
|
Meteor Impact Site
|
New Bodhum 003 AF –Next Day – Live Trigger Rewards
First things first – open the chest that appears next to you for your first Live Trigger reward. Your datalog has been updated and a couple of new features added to the main menu – the most notable of these being the ability to generate and organize your own paradigms. Still, your creativity with paradigms is limited by the fact that you still only have two party members with three roles available to each of them. This is fine, though, as you’ll find the battles to be had in New Bodhum really don’t require very specialized strategies at all. Anybutt, we’ll talk paradigms more later.
Out in the NORA House common area, e’erybody got something to say, but be sure to talk to Lebreau for a Live Trigger.
Live Trigger (POTENTIAL SPOILERS)
Head outside for one last conversation with Noel before you are given your objective and allowed to move freely around the village. You are told to search for an artefact – this isn’t too difficult with the help of Mog, who makes it very obvious when he notices something in the vicinity.
This is going to sound a little weird, but it’s important to a mission you will pick up later on. You may have notice that when you press □ to open the map, a percentage appears at the bottom of the screen. This tells you the percentage of the area that you have explored. The area that you’ve explored will be highlighted blue on the map, while the remainder will be dark. Throughout the game, you will see that in some areas, even though it looks like you’ve filled in the entire map, your percentage still isn’t at 100%, even when you zoom in with the left joystick and get a better look at the area you haven’t covered. In New Bodhum 003 AF in particular, if this annoyance occurs, go back to the NORA House and explore every single nook and cranny of the place – and I do mean EVERY SINGLE NOOK AND CRANNY –particularly the verandah around the front entrance. If this fails, explore the town further; hit up all the little corners around the beach houses, and be sure to run to the end of the dock.
Talk to Noel first for a Live Trigger, then simply move toward the left, where a palm tree sits in the midst of some rocks, and Mog will instantly alert you. Follow him to the little yellow exclamation point above the rocks, and examine the spot.
Live Trigger (POTENTIAL SPOILERS)
A long cutscene will follow. You will encounter a few scenarios like this at this stage, where Mog appears to find something interesting, and it leads to a reveal of some of the backstory and some Live Triggers that allow you to get to know Noel and his mission a little better. Those who are more interested in the gameplay will probably find their fingers itching for this stretch of the game, though you can skip the cutscenes by pressing Start and then Select. (However, this means the Live Triggers will be skipped as well!)
Talk to Noel again after the conclusion of this scene.
Live Trigger (POTENTIAL SPOILERS)
Live Trigger (POTENTIAL SPOILERS)
Be sure to talk to the woman in the green shirt with short blonde hair sitting on the shore nearby. Her name is Nel, and she will present you with your first optional mission called a Fragment Quest. These missions usually require you to find an item that has been lost due to the paradox and will reward you with a fragment when you have completed them. You can read more about these in the Datalog under Primers: Exploration > Fragment Quests. Accept the mission from Nell.
Next, move to the beach houses on the other side of the village. Mog will begin chasing a cat. First try to examine it by the walkway. You’ll have to chase Mog and the cat for a bit before you catch up with her for another cutscene and a Live Trigger. (If you lose sight of either Mog or the cat, press Square for the map and find Mog’s pink icon to locate them again.)
Live Trigger (POTENTIAL SPOILERS)
After this, walk around the backside of the houses, past the blue benches and onto the little garden platform. Mog will react to the town kids, but first you may want to examine the plants for another Live Trigger with Noel.
Live Trigger (POTENTIAL SPOILERS)
Live Trigger (POTENTIAL SPOILERS)
After chatting with the kids, one of them will take off running, and you will now be prompted to run after him. Look for the large yellow exclamation point above his head to keep him in your sights. Chase him all the way to a cliff on the Winding Way. On the way, you should encounter all the same enemies you encountered last night traveling this way. Use the same strategies – Double Trouble for Gorgonopsids, Nekton, and Spiceacilians, and Slash & Burn followed by Double Trouble once Staggered for Pulse Soldiers.
Once you’ve found the kid, Rhett, you will have to go through a couple of different Live Triggers. Up until now, you’ve only been able to choose one option during a Live Trigger, with none of the four answers being either ‘right’ or ‘wrong’. This time, you have to choose the right option to get Rhett to talk. Choosing the wrong option will mean you have to try again with the same Live Trigger. You can’t “lose” in this situation, though you may have to go through all three other options before picking the right one if you prove to have bad judgment. For the impatient ones, the right answers are first X, and then ∆ for the second Live Trigger.
Live Trigger (POTENTIAL SPOILERS)
Live Trigger (POTENTIAL SPOILERS)
Now after all this, follow Noel, and chat with him just before the Beachfront for another Live Trigger concerning Snow. (For your amusement: Choosing ∆ here will result in probably one of the best Live Trigger responses in the game.)
Live Trigger (POTENTIAL SPOILERS)
Once back in the village, Noel and Serah have yet another conversation about their hard luck finding an artefact. Follow their suggestion to take a look in the NORA House. You may notice as you approach the building, a glowing light is coming from the window of Serah’s bedroom, and the townspeople are gathering outside in wonderment. Investigate to find a strange otherworldly mirror has suddenly appeared on the wall of the room, and examine it. Ta-da! You now have your Giant’s Artefact. Additionally, a square treasure chest will appear in the room with your Live Trigger Reward.
After heading outside and going through one more cutscene (take a deep breath, adrenaline junkies, this is finally the last one before you can savor a bit of battle), head to the Beachfront. Take some time here to go into the Crystarium and develop your characters a little bit. You should have enough CP to level Serah up to a Level 4 Commando (teaching her the ability Blitz), a Level 7 Ravager (teaching her Thunder, Flamestrike, and Sparkstrike), and a Level 3 Sentinel (teaching her Steelguard); as for Noel, he should get up to a Level 8 Commando (learning Blitz and Blindside), and a Level 6 Sentinel (learning the abilities Mediguard and Fringeward). To make this a little more basic visually, I’ll sum these Crystarium levels up in tables – light blue for Serah, red for Noel.
Role
|
Level
|
Abilities Learned
|
Commando
|
4
|
Blitz (Lv. 4)
|
Ravager
|
7
|
Thunder (Lv. 3), Flamestrike (Lv. 6), Sparkstrike (Lv. 7)
|
Sentinel
|
3
|
Steelguard (Lv. 3)
|
Role
|
Level
|
Abilities Learned
|
Commando
|
8
|
Blitz (Lv. 4), Blindside (Lv. 8)
|
Sentinel
|
6
|
Mediguard (Lv. 3), Fringeward (Lv. 6)
|
The paradigms you have by default will work great. You should have no reason to use any paradigms other than Slash & Burn, Double Trouble, and occasionally Twin Shields, anyway. All you need to do at this point is set your default paradigm to Slash & Burn. (Party Paradigms, Customize, then select Slash & Burn and press Square. If the Slash & Burn slot is now the one glowing instead of Double Trouble, then you dunnit right.)
You can choose one of two ways to get back to the Impact Site. You can either go through the Winding Way you did the night before, or take the shortcut through the Tidal Shallows. I suggest going the short way first!
Down in the Tidal Shallows, you’ll find a treasure sphere with an Iron Bangle, and on the other end of the Tidal Shallows is a treasure sphere with a tuft of Phoenix Down. In addition to the usual roster of enemies, there are two new enemies roaming specifically in the Tidal Shallows area.
Area Enemies

If you encounter only one of the Sarracenia, it can easily be taken down using the Slash & Burn paradigm for a five-star rating. However, their Nutrient Absorption ability makes them formidable in pairs. In this case, don’t lose any time in executing your Auto-battle commands. However, if you’ve leveled up and have Slash & Burn as your starting paradigm like I suggested, then you should still be able to take them down quickly enough to get a five-star rating. (The Iron Bangle which you just received, and which you can also get as spoils from defeating a Pulse Soldier sometimes, should be very useful here though, since it adds 10% HP to a character’s max health while equipped.)
The Tabasco Toad will most often appear with a couple of Spiceacilians at its side, though sometimes the enemy formation will consist of two Tabasco Toads. The thing about Tabasco Toads is that they can summon more Spiceacilians into battle, an ability they like to exploit early and often. Thankfully, Spiceacilians are obviously small fry, and Tabasco Toads may be tougher, but not much, so as long you execute your moves as quickly as possible, they shouldn’t be a worry either.
Now you will jump back up to the end of the Winding Way. FIRST, go up the hill to find a square treasure chest. Open it for the Medical Kit, which is required to complete your Fragment Quest. Now, go back down the hill and continue toward the Impact Site, and you will encounter a familiar and apparently persistent enemy.
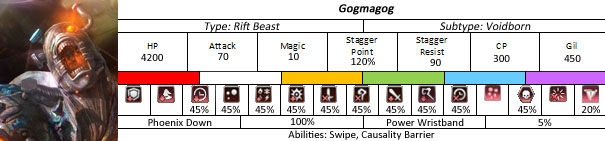
This time, Gogmagog will start the battle by casting a Causality Barrier over itself, which greatly reduces physical damage. Use Slash & Burn to drive up his chain, switching very briefly to Twin Shields whenever you see Swipe coming, just like in the last battle. Once he is staggered his barrier will fall, so switch immediately to Double Trouble and start hammering away at him. Do not switch to Twin Shields while he is staggered, and instead ignore the damage caused by Swipe! He will fall before Serah and Noel are even in any real danger, and you will get a five-star rating and Gogmagog Fragment Beta.
A chocobo will appear now at the edge of the Impact Site. (Kweh!) You should have Gysahl Greens, so – hop on! Ride the chocobo back to the village and talk to Nell to return her Medical Kit to her. (You can talk to her while on the chocobo, so you won’t have to use more Gysahl Greens remounting a chocobo in the Town Square.) You will get 50 CP and the Heart Prism Fragment as a reward.
Check out your Crystarium – you should once again have adequate CP for some good upgrades. Before you can complete these upgrades, for each character, you will get a message that your Crystarium has expanded! This means you can choose from a number of level bonuses. Right now, I would suggest either increasing ATB gauges or getting role bonus boosts. (Specifically, I would recommend you give both an additional ATB gauge.) The Commando Bonus Boost for Noel (Damage Boost) could be partially emulated by equipping him with the Power Wristband you got from defeating Gogmagog the second time.
Role
|
Level
|
Abilities Learned
|
Commando
|
8
|
Powerchain (8)
|
Ravager
|
12
|
Blizzard (10), Aero (12)
|
Level Bonus:
|
Increase ATB gauge
|
Role
|
Level
|
Abilities Learned
|
Commando
|
12
|
Scourge (12)
|
Sentinel
|
10
|
Deathward (10)
|
Level Bonus:
|
Increase ATB gauge
|
One more thing you should check: exploration percentage on your map. If it’s not 100% and you can’t figure out why, go back and read my tip toward the beginning of the Episode 1 Part 2 walkthrough.
Now you can head back to the Impact Site, dismount, and examine the gate for a Live Trigger: Noel will ask you if you are ready to step into the flow of time. If you say no, then you will simply have to go back, examine the gate, and change your answer when you are ready. (Also, even though the “no” option will be grayed out after you’ve used it once, you can still select it as many times as you want.) There’s no more reason to hang around New Bodhum, so I’m sure you’ll want to choose “yes” to conclude this episode and start time traveling!
Subscribe to:
Posts (Atom)